
 If you own a nice telescope outfitted with solar filters, you’re probably an advanced enough user not to need these dumbed-down, step-by-step instructions. If, improbably, you share my situation—an absolute noob with a big, complex scope on her hands—I offer the following easy, lowest-tech way to align and track to the sun.
All thanks and kudos go to Grant Tandy, Astronomical Interpreter at the Oregon Observatory at Sunriver. During a practice session with Grant I learned that the alignment process—contrary to the marketing prose at Celestron.com—is more finesse than precision. One of the most valuable and consoling takeaways during the guided viewing with Grant was discovering that “close enough,” “keep trying, it’s hard,” “just turn it on and off and start over,” “it takes practice,” and “you’ll get used to it” are all acceptable stargazing concepts.
Do I need a solar filter?
Oh hell yes. Unequivocally. Without it, you’ll destroy the corneas of your eyes, and the plastic gizmos inside the telescope will melt. The solar filter reduces sunlight to the optics—both yours and the telescope’s.
What kind of filter should I get?
There are two main types: “white light” and hydrogen-alpha (“H-alpha”). Without going into detail, a white light filter allows you to see sunspots and some textures in the photosphere. They’re great for the safe viewing of partial solar eclipses, and the transits of Venus and Mercury. You’ll see a white image of the sun (or sometimes a yellow-orange color).
With an H-alpha filter you’ll observe all of the above, plus solar flares and prominences. Thusly, they cost a lot more; expect to pay up to a grand for a high quality system. The H-alpha filter transmits only one wavelength of light in a deep red color, and that’s how you’ll see the image of the sun.
I selected the two-part H-alpha system from Thousand Oaks Optical for use with my 8SE. It includes the energy rejection filter (ERF) that fits over the business end of the telescope, covering the aperture, and the H-Alpha filter unit (HAU), which acts like an eyepiece. The HAU and ERF are always used together, and the following steps include installation of both. (“Installation” is strong. They just pop into place.)
Where do the filters attach on the scope?
It’s safest for your telescope to be indoors, in the shade, or at the very least pointing well away from the sun when you’re changing solar filters. Just remove the plastic protective cover from the front of your telescope, and replace it with the big solar filter cap/energy rejection filter (ERF). Position the circle cutout at the top, at 12 o’clock. Then remove whatever eyepiece you were last using for nighttime viewing, and insert the solar eyepiece/H-Alpha filter unit (HAU). It works in tandem with a regular viewing eyepiece.
Select the right eyepiece.
Splurge on the the Celestron accessory kit, a nice assortment of five eyepieces, a Barlow lens, and a bunch of fun filters in a sharp little metal case. (We experimented with the Barlow for X2 magnification, but settled on the 32 millimeter for solar viewing.) All right! Let’s look at the sun!
Bring the telescope outside where it’s sunny.
Do this on a clear day, of course. Carry the scope (it’s heavy) from the base, where the battery compartment is. Bring along your eyepieces and the PowerTank if your extension cord won’t reach from the source of the shore power. Turn the telescope on. (The power switch is at the base of the fork arm.)
How do I align the telescope directly to the sun without risking my eyesight?
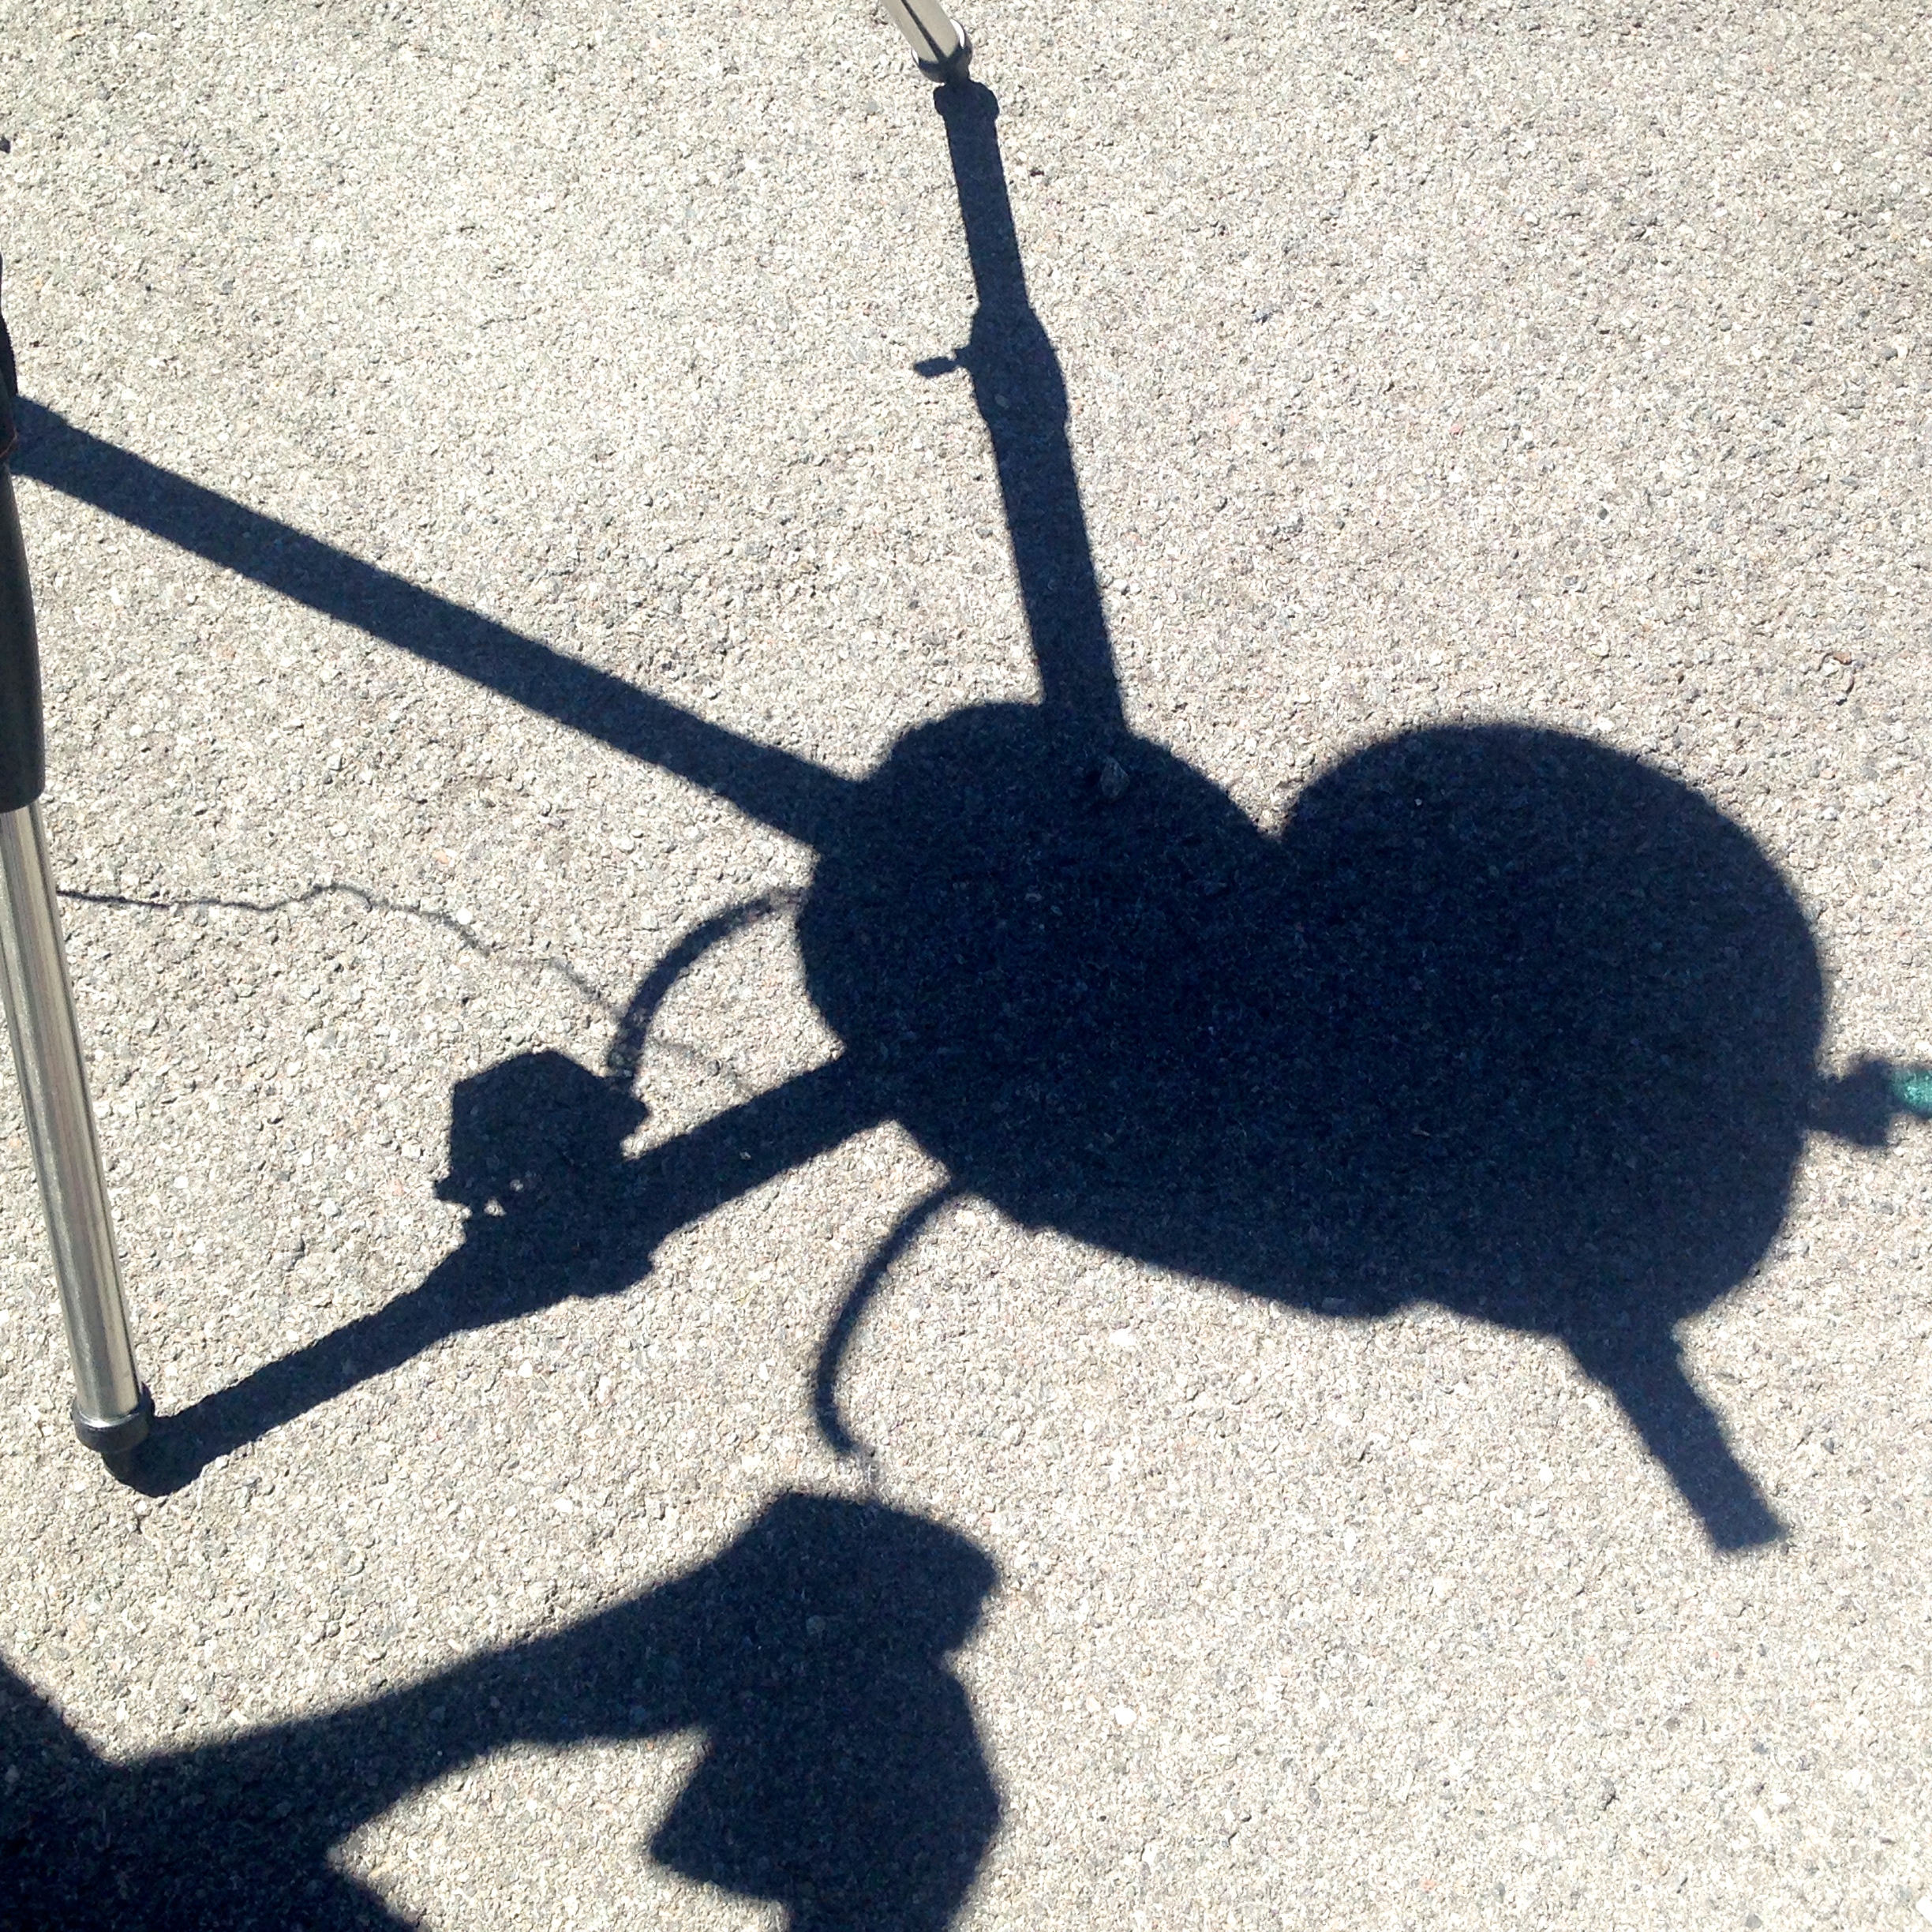
Good question. You could stare right up at the sun to see exactly where it is in the sky, but that’s not a good idea, is it? Use the shadow of the telescope on the ground as your guide.
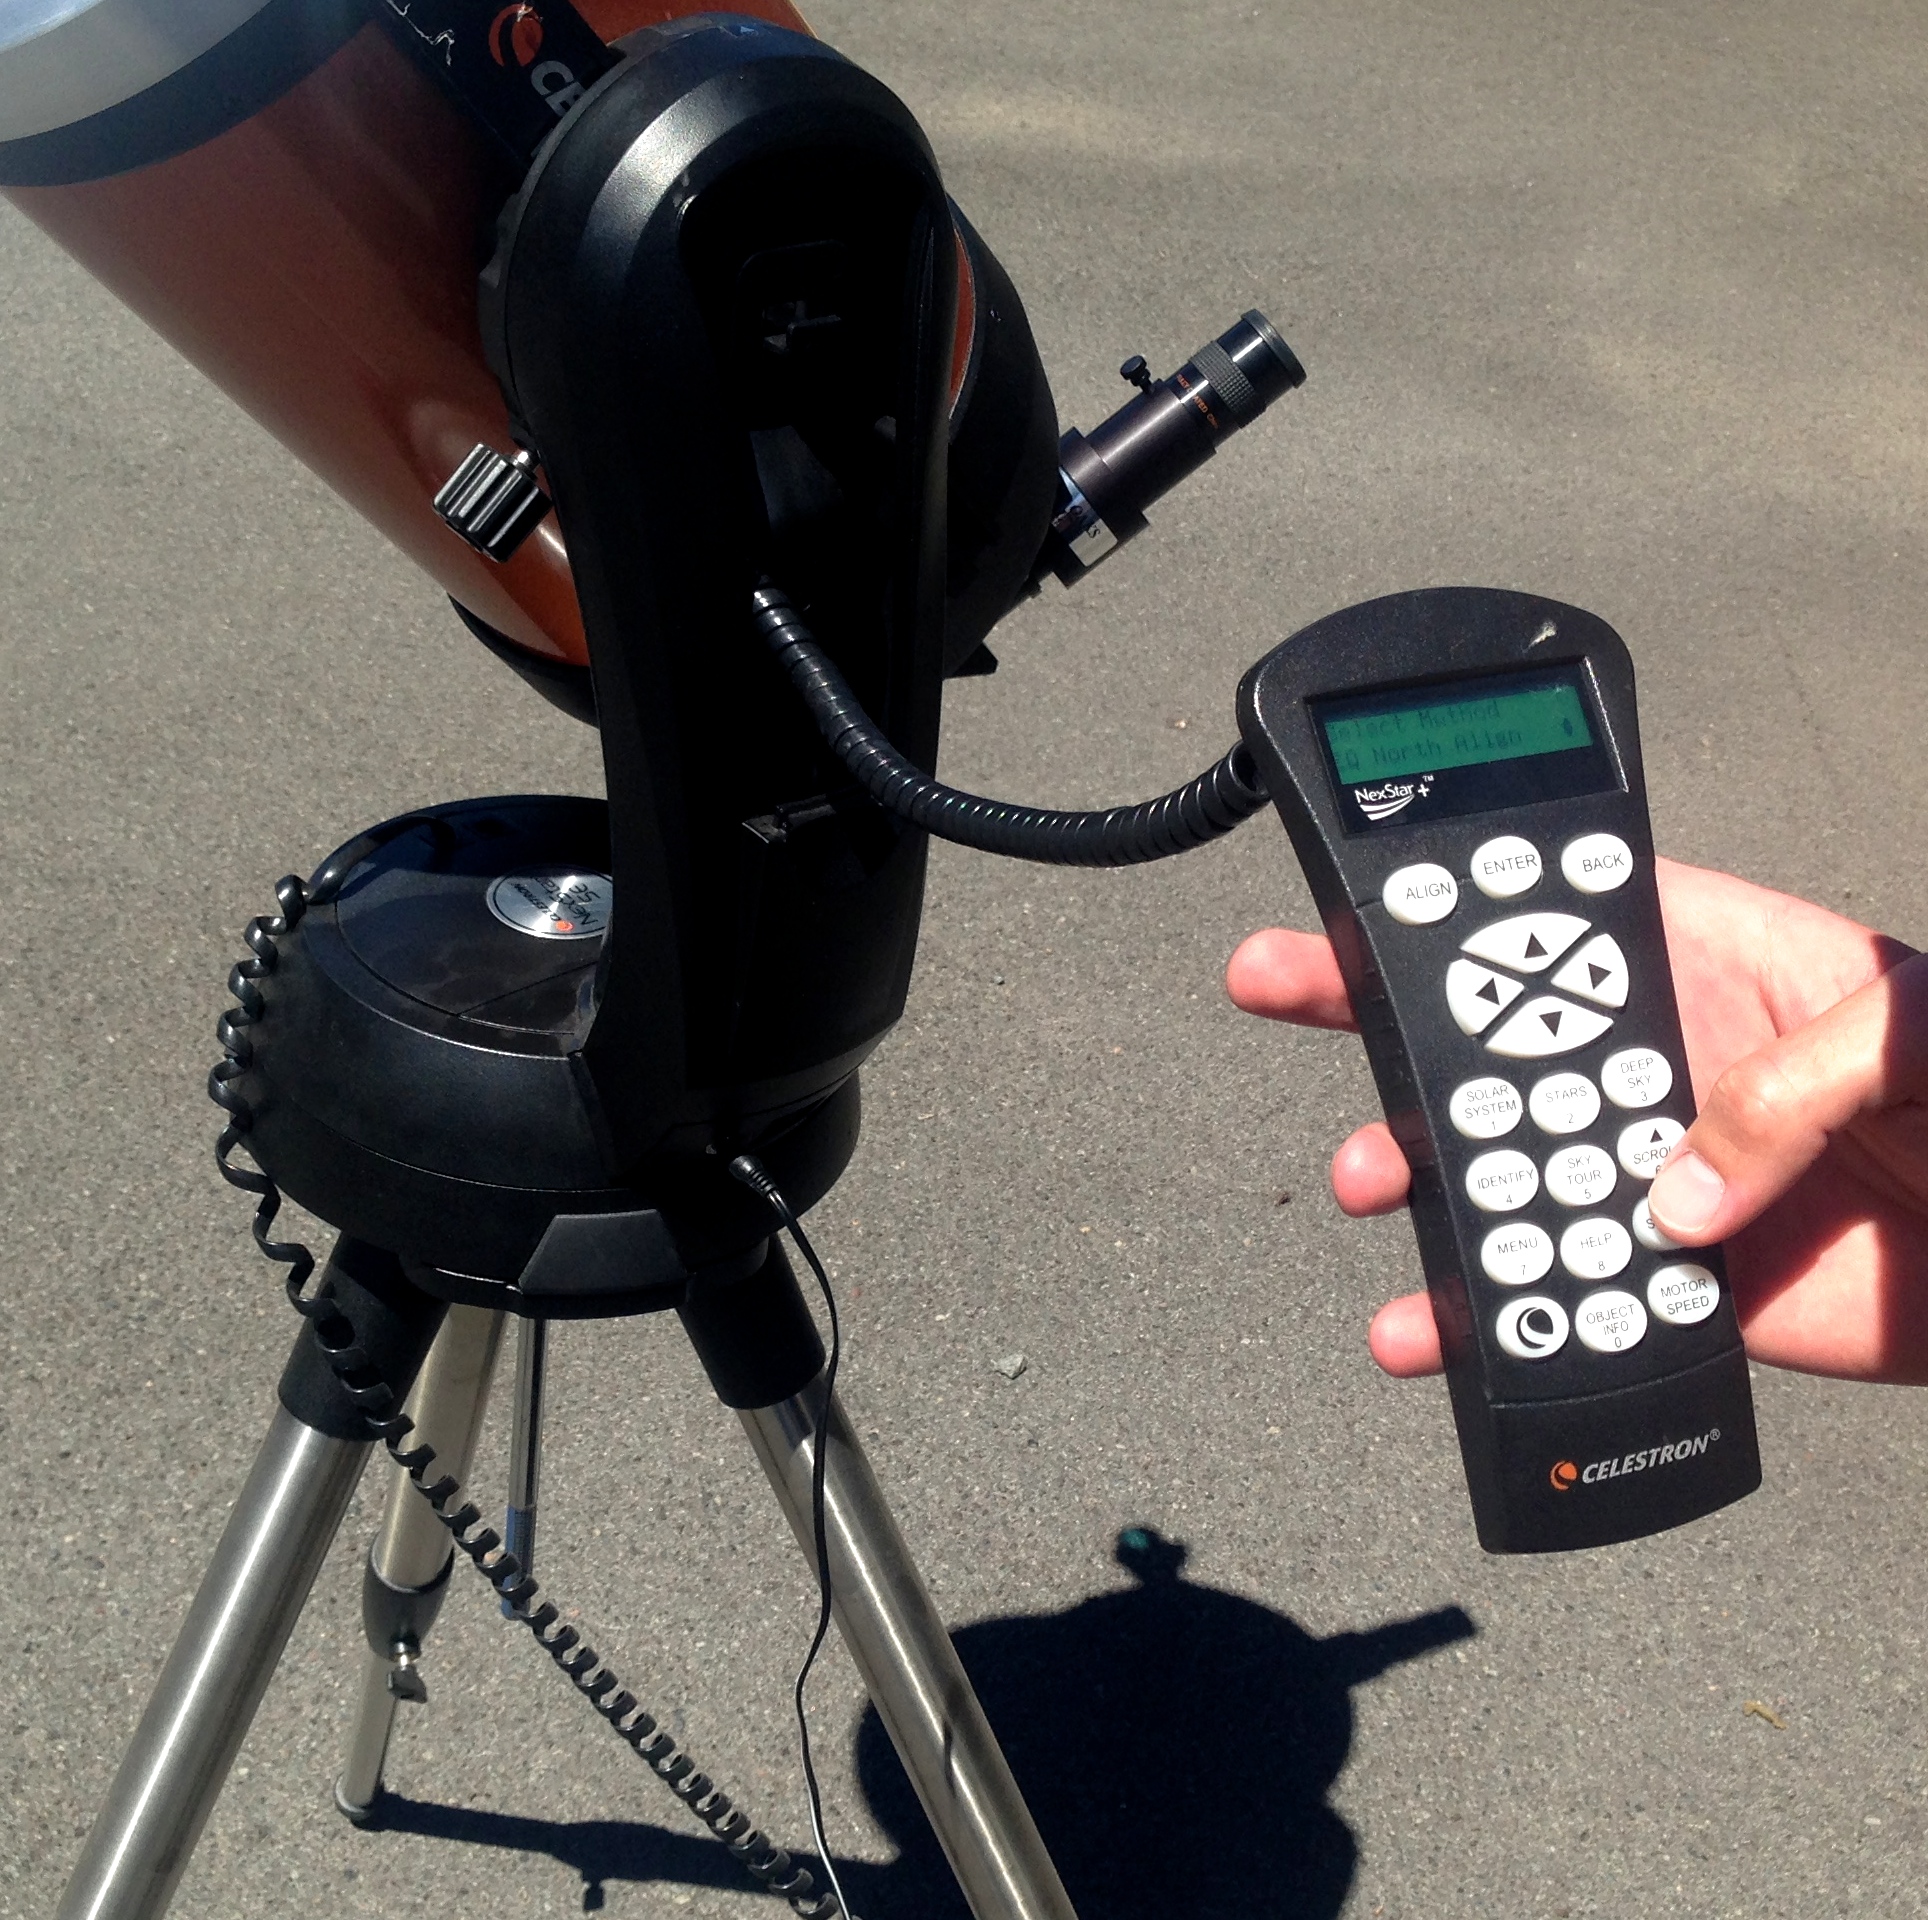 But first, you’ll be using the computer in a minute, so check the settings. You’ve probably already used your NexStar hand controller to key in the date, time and location. Run through the setup procedures again to make sure the correct data was stored; you might have to update the time.
Press “Enter” to begin alignment.
Use the scrolling arrows on the hand controller (the small arrows, not the big PlayStation-style ones that move the telescope) to find “Solar System Align”. Press enter. (It may ask for the time. If it displays as correct, press enter.)
“Select Object”. Scroll to find “The Sun”. Enter.
See an ominous warning: “Do not look at the sun without the proper filter.” We’re good. Right? Better doublecheck. (I wonder how many people per year fry their eyes this way. Probably during a solar eclipse it’s chronic.) Press enter.
Now use the big direction key arrows to tilt the scope up toward the sun. Watch the shadow of the telescope on the ground; angle it around, looking at the different shadows made by the optical tube. If it’s a sausage-shape, you’re not quite there. An oval? Closer. Stop when the shadow is as perfectly round as you can get it.
Now set the telescope to track the sun.
Look into the solar eyepiece. If you’ve nailed the shadow, you’ll see a small-ish, spot-on, perfectly centered image of the sun. (It’s fine if it’s off to the side a little).
Don’t panic if you see a cookie bite in the sun at first. There isn’t an eclipse in progress, that’s just the solar filter. That bite will go away when you get everything aligned and are using the right eyepiece. (Make sure the mirror circle of the big solar filter is toward the top.)
If you don’t see the sun, do you at least see a shadowy, ambiguous patch of red? Good. That means the sun is just off to the edge of the filter, and you’re very close to where you want to be. Slowly tap the arrows in each direction until the sun appears. If you see more red coming into view, keep going in that direction.
Insert the viewing eyepiece.
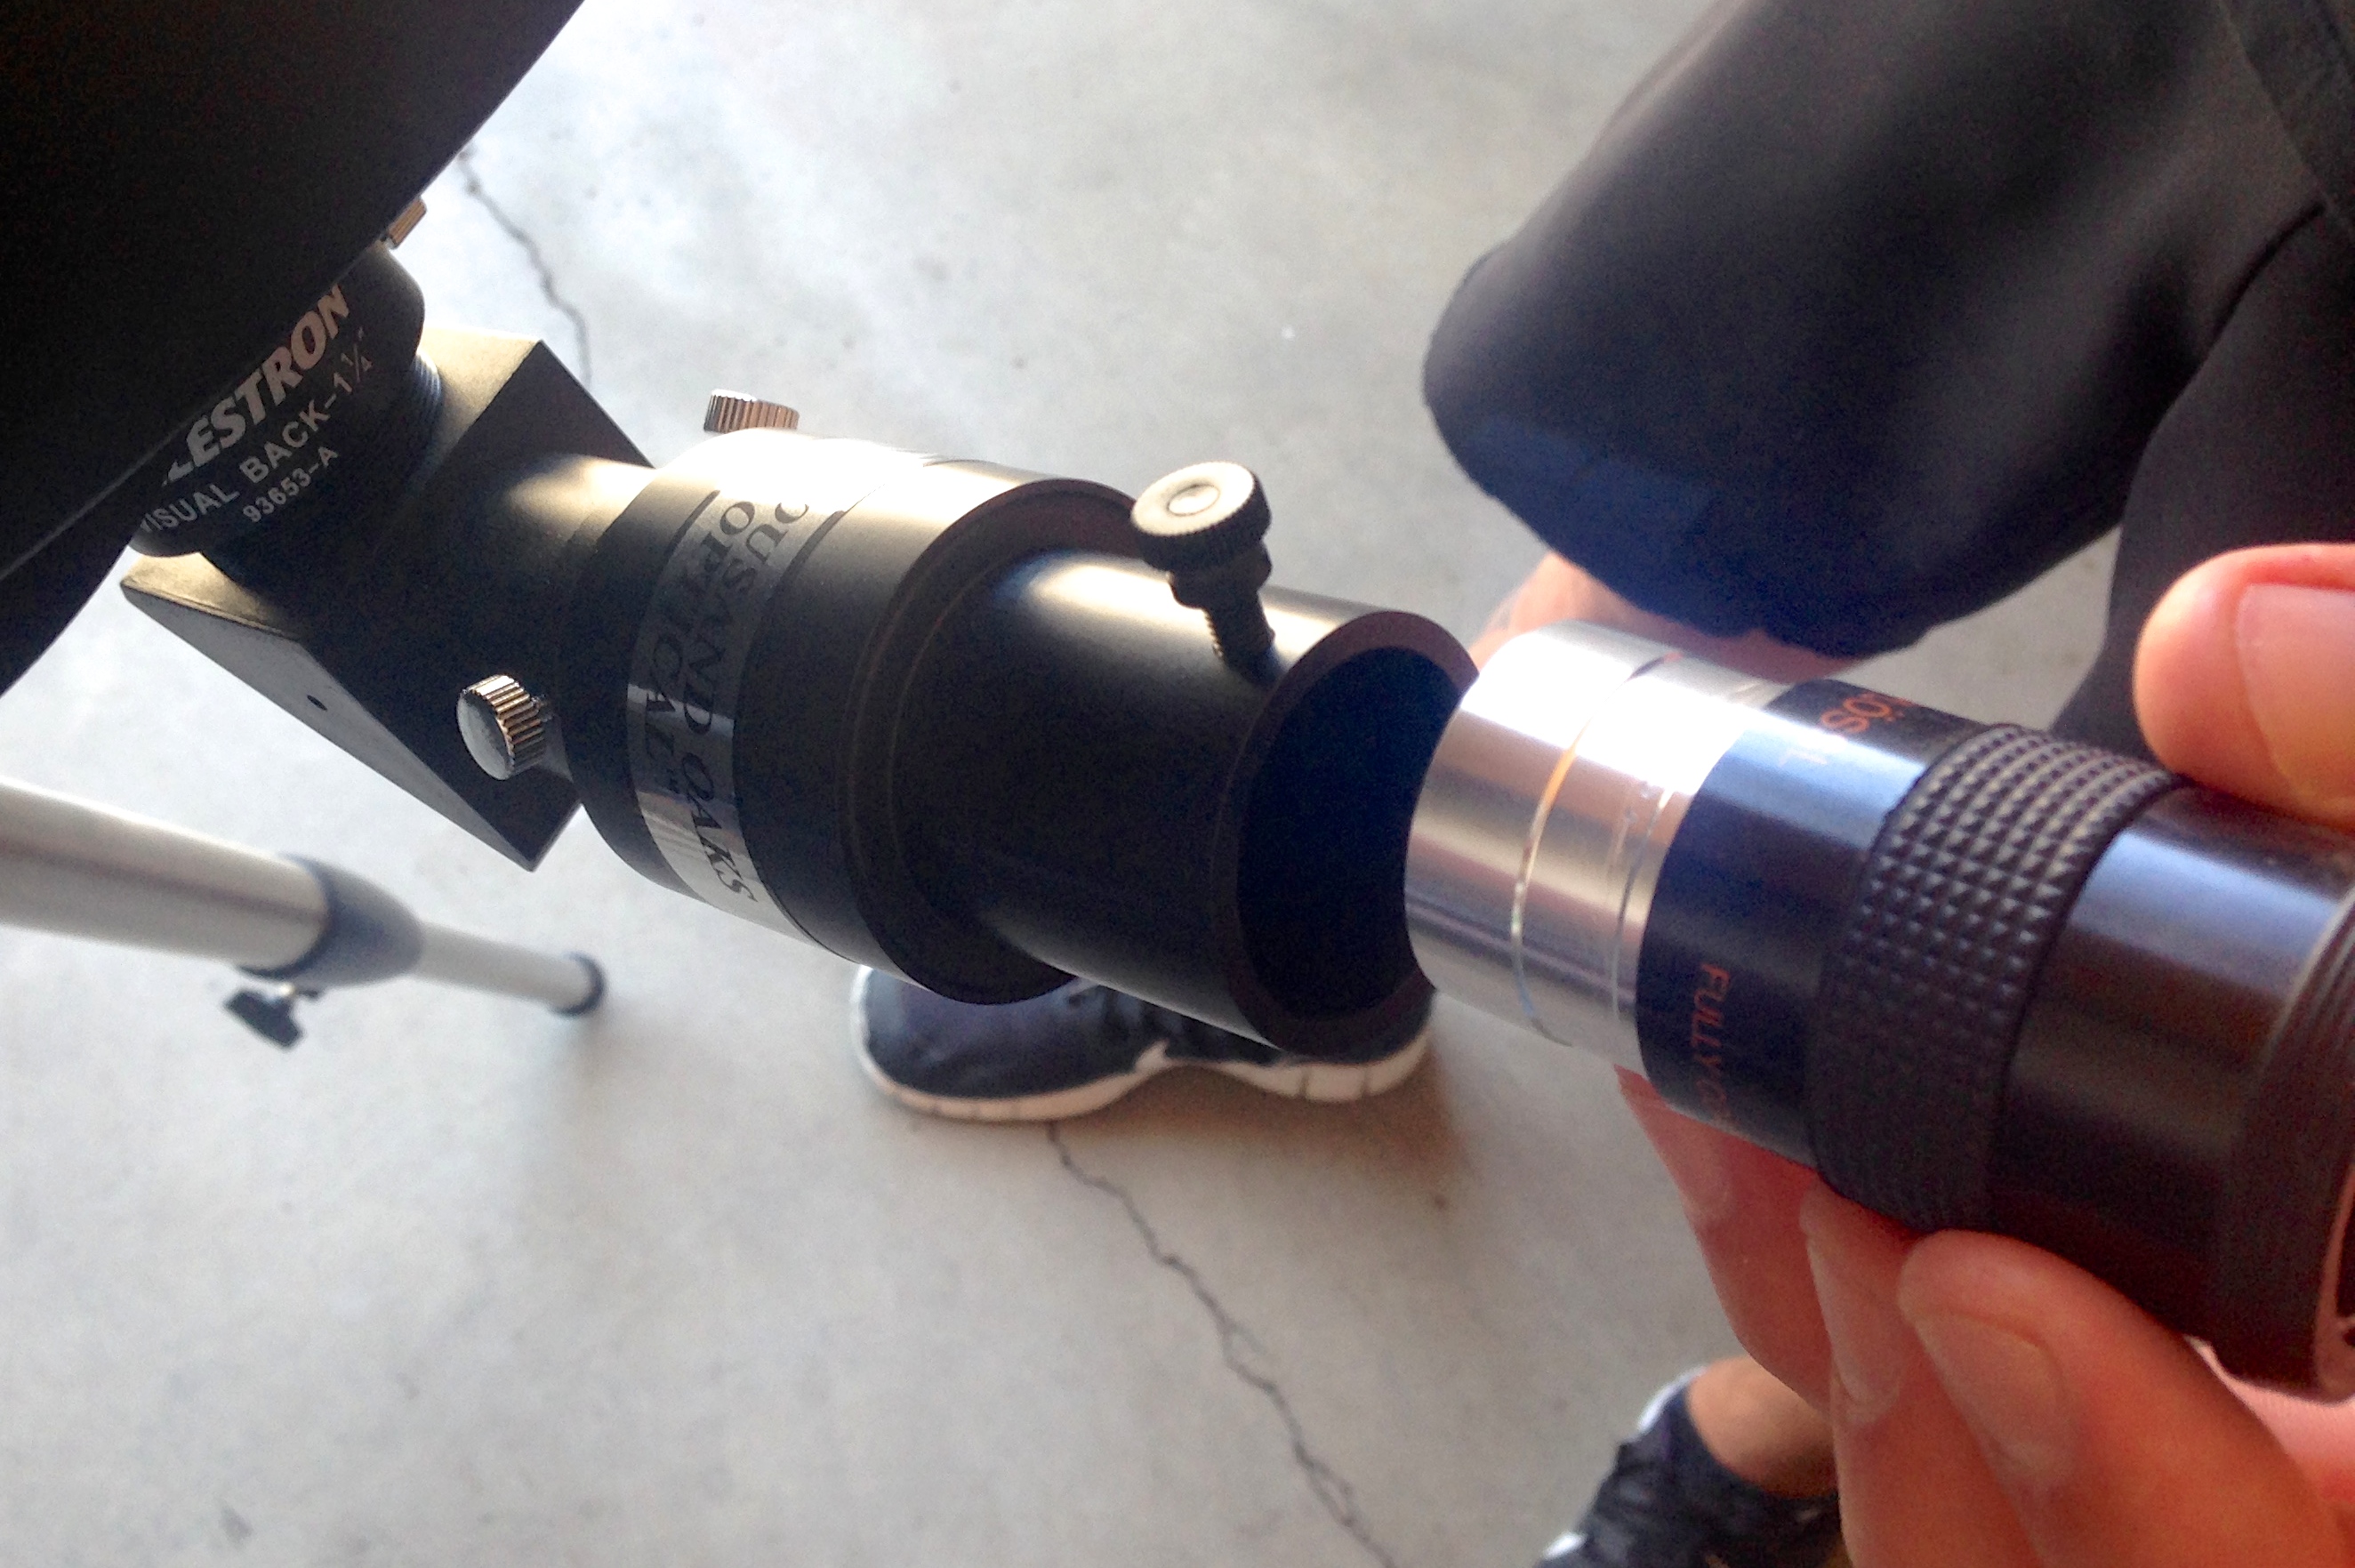 Again, we recommend the 32mm. “It gives you a bigger view,” advised Grant. Indeed, the ball of the sun nearly completely fills the eyepiece with the 32.
Dock it on top of/behind the solar eyepiece. You can’t screw this up— they only fit together one way: solar first, viewer second. Secure them both by tightening the little silver knobs. (Not the white plastic knob. That’s a focus adjustment. More on that later.)
Look into the eyepiece: now you’ll see a big image of the sun. As it’s so large, you’ll have to align it perfectly to keep it in the middle. Use the right/left/up/down direction key arrows to zoom the view around until the sun is centered. The controls seem counterintuitive at first, due to the diagonal of the mirror that flips the image of the sun. You’ll get the hang of it. At any time you can slow down the motor speed as needed. (Press the motor speed/rate button, then a number on the keypad, like 4, or 6. No need to press enter.)
As soon as the sun is centered—doublecheck one last time that the full image of the sun appears centered in the eyepiece and hasn’t wandered away—press “Enter”, “Enter”, then “Align”.
“Align success”! If you went through the process correctly, and the sun was pretty well centered in the eyepiece, the clock drive will take over and the telescope will now track the sun to keep it centered. From here, you can fiddle around looking for sunspots and flares at the edge. You can fine-focus even while the telescope is tracking.
What if it’s not tracking?
The sun was probably not perfectly centered when you selected the final alignment buttons. Just go through the process again. Or swap eyepieces and try again. The alignment may never be perfect, and you might have to re-center the sun every five or ten minutes. If you’re actively observing, minor tweaks will keep it in alignment.
Lost the sun? Remove and pocket your viewing eyepiece and look back through the solar eyepiece to locate the red area again. Completely lost? Turn off the telescope for ten seconds to reset the computer.
If you go in for a sandwich you can always come back and start over. Just keep trying. A person I’m close to—I won’t say who, but it rhymes with my smushband—will always default to “this thing is broken!” after about two minutes of failure. “This equipment is very technical,” assured Grant. “You have to play around with it.”
Note that you don’t NEED to set the scope to track. You can make continual minor swiveling adjustments with the direction keys to keep the sun from floating out of view if you’re not using the clock drive. Don’t forget that you can change the swivel speed.
I’m having trouble seeing.
“It’s tough,” said Grant. “With the way the eyepieces are angled, and especially during the day, it’s tough to get your eye on it.” You might be seeing a floating red ball, a blob like mercury in a thermometer, your own eye, your eyelashes. Sunscreen may be running into your eyes. A sun shade might help but I don’t think Celestron sells one for the 8SE. Just relax and keep at it. If you wear prescription eyeglasses or sunglasses, look into the eyepieces without them on. I cup my hand over my non-viewing (left) eye to avoid squinting and distortion.
Damn it’s hot out here in the driveway.
Yes, it is. Hydrate. Don’t worry about your scope so much. It can take the heat as long as you’re out there with it.
What are those black discolorations on the surface of the sun?
Sunspots! You’ll see them alone or in a cluster or sunspot grouping, caused by the magnetic field of the sun. To put their size into perspective, envision that the diameter of the sun is about 110 Earths, side by side across. A nice visible sunspot is about the size of Earth. On an “active” day you’ll see more.
Now look for prominences.
Scan around the edge of the solar disk. If you see a misty, foggy rising, turn the little plastic white knob this way and that to bring the prominences in and out of focus. Use it in tandem with the big black focuser knob at the base of the optical tube…whatever works. This won’t disturb the tracking.
If you’re well-focused on prominences, you’ll be in a good position to clearly see any sunspots. Both are related to the erratic magnetic field on the sun, which causes random jets of hydrogen to come out (as a prominence), or, less commonly, as a big flare or loop.
“Most prominences are not very prominent,” observed Grant. Don’t see any? Maybe there’s just not a lot of activity today. Try again some other time.
Fun fact: When you see a prominence, you’re seeing it eight minutes ago. That’s how long it takes the light from 93 million miles away to reach us.
Adjust your expectations.
Though a prominence is actually moving like a flame or a geyser, you won’t see it that way “because it’s on such a large scale,” explained Grant. “If you think about a prominence—an average, kind of medium-sized prominence—it’s about 40,000 miles across. If it’s moving 2000 miles an hour, you’re looking at it moving 1/20th of its total distance in one hour. So you see just a small fraction of it move in an hour. If you were to come back six hours later, you’d see more of it has moved.”
There are so many filter-enhanced and computer generated astrophotos in Discover magazine and on Instagram and elsewhere online that you might be disappointed in the actual view through your eyepiece. Try to maintain perspective—you’re a speck standing 93 million miles away, looking at flames on the sun. That’s pretty cool.
I still can’t get this frickin telescope to work.
You are not alone. Try the Beginner’s Forum on Cloudy Nights online or the recently added Cloudy Cities list to find other astro-geeks in your neighborhood.
Sky provides an easy way to find your local astronomy club. “Astronomy is fun,” states their website, “but it can be even more fun when you do it with other people. Sky & Telescope encourages you to contact your local astronomy club, where you’ll find like-minded enthusiasts eager to share their knowledge and love of the sky with you. Club meetings offer opportunities to try out new equipment, learn new techniques, and make new friends. They are one of the best resources around for developing your skills and passion for astronomy. In addition to clubs, you’ll find planetariums, observatories, museums, and other great resources, all of which appear in our directory of clubs and organizations.” Slick!
Plan ahead to look for specific phenomenon, like sunspot groupings. SpaceWeather.com lets you know “what’s up in space” on a daily basis, or subscribe to NASA’s various social media channels.
Want to feel connected to the universe? View the daily solar photo from the SOHO space telescope, then point your own little scope on Earth at the sun. You’ll see the exact same image.

